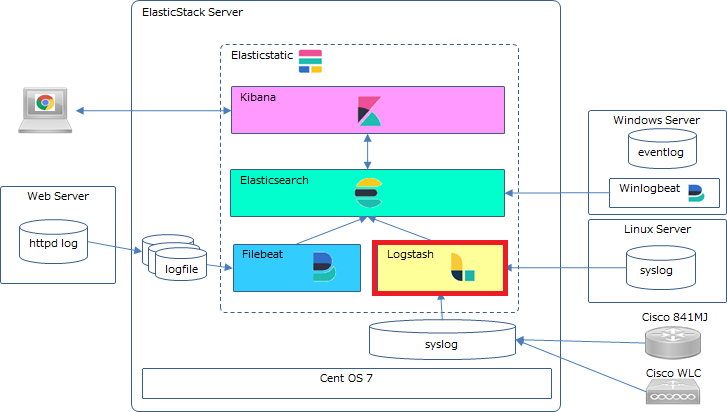
Logstashのインストール
だいぶ間が空きましたが、今回の記事は、Logstashのインストール手順です。その間にElastic Satckもメジャーバージョンアップして 7.0 がリリースされました。記事ではLogstash 7.0を使用します。
Elastic Stack 6.7からはJDKのバージョンも8 or 11が前提となっているようです。


1.設計要素
実際はパイプラインの構成とか考えて設定ファイルを修正することになると思いますがとりあえず動かすだけならばデフォルトのままでもいけるかと思います。
logstash.yml
| 設定項目 | logstash.yml内の項目名 | デフォルト値 |
| ノード名 | node.name | ホスト名 |
| データ保存パス | path.data | LOGSTASH_HOME/data |
| 並行処理のワーカー数 | pipeline.workers | サーバのCPUコア数 |
| ワーカー毎の入力受付最大数 | pipeline.batch.size | 125 |
| イベントディスパッチ待機時間 | pipeline.batch.delay | 50 |
| キューイングタイプ | queue.type | memory |
| キューのディレクトリパス | path.queue | path.data/queue |
| ページファイルサイズ | queue.page_capacity | 64mb |
| 未読イベント最大数 | queue.max_events | 0 (制限無し) |
| キュー容量(バイト) | queue.max_bytes | 1024mb (1g) |
その他の項目については、Logstash Reference を参照してみてください。
実際に本運用するシステムの設計については別途記事を書ければと思います。
pipelines.yml
パイプラインの設定については、一旦デフォルトの内容で使用します。パイプライン構成については別の記事で書ければと。
jvm.options
Elasticsearchと同様ヒープの設定を行う必要がありますが、ワーカーの設定内容と合わせてチューニングしていくことになるかと思います。(この記事ではデフォルトのままでいきます)
2.インストール
インストールは他のパッケージと同様にyumで行います。
この記事ではシングルノードで構築するので、 PGP Keyやリポジトリ設定はElasticsearchのインストールで設定済みなので割愛しますが、Logstashを単独ノードで立てる場合は、PGP Keyのインストールやリポジトリ設定を行ってください
⓶Logstashのインストール
#
# yum install logstash
#
⑤設定ファイルの編集
logstash.yml
以下の設定をします。(デフォルト値を変更した箇所のみ抜粋)
・ノード名:サーバのホスト名を設定
・キューイングタイプ:persisted
実際に本運用するシステムの設計については別途記事を書ければと思ってます。
#
# ------------  Node identity ------------
#
# Use a descriptive name for the node:
#
node.name: ${HOSTNAME}
#
# If omitted the node name will default to the machine's host name
#
~ 省略 ~
#
# ------------ Queuing Settings --------------
#
# Internal queuing model, "memory" for legacy in-memory based queuing and
# "persisted" for disk-based acked queueing. Defaults is memory
#
queue.type: persisted
#
# If using queue.type: persisted, the directory path where the data files will be stored.
# Default is path.data/queue
#
# path.queue:
#
# If using queue.type: persisted, the page data files size. The queue data consists of
# append-only data files separated into pages. Default is 64mb
#
# queue.page_capacity: 64mb
#
# If using queue.type: persisted, the maximum number of unread events in the queue.
# Default is 0 (unlimited)
#
# queue.max_events: 0
#
# If using queue.type: persisted, the total capacity of the queue in number of bytes.
# If you would like more unacked events to be buffered in Logstash, you can increase the
# capacity using this setting. Please make sure your disk drive has capacity greater than
# the size specified here. If both max_bytes and max_events are specified, Logstash will pick
# whichever criteria is reached first
# Default is 1024mb or 1gb
#
# queue.max_bytes: 1024mb
#
# If using queue.type: persisted, the maximum number of acked events before forcing a checkpoint
# Default is 1024, 0 for unlimited
#
# queue.checkpoint.acks: 1024
#
# If using queue.type: persisted, the maximum number of written events before forcing a checkpoint
# Default is 1024, 0 for unlimited
#
# queue.checkpoint.writes: 1024
#
# If using queue.type: persisted, the interval in milliseconds when a checkpoint is forced on the head page
# Default is 1000, 0 for no periodic checkpoint.
#
# queue.checkpoint.interval: 1000
#
pipeline.yml(デフォルトのまま)
# This file is where you define your pipelines. You can define multiple.
# For more information on multiple pipelines, see the documentation:
#   https://www.elastic.co/guide/en/logstash/current/multiple-pipelines.html

- pipeline.id: main
  path.config: "/etc/logstash/conf.d/*.conf"
jvm.options(デフォルトのまま)
## JVM configuration

# Xms represents the initial size of total heap space
# Xmx represents the maximum size of total heap space

-Xms1g
-Xmx1g

################################################################
## Expert settings
################################################################
##
## All settings below this section are considered
## expert settings. Don't tamper with them unless
## you understand what you are doing
##
################################################################

## GC configuration
-XX:+UseConcMarkSweepGC
-XX:CMSInitiatingOccupancyFraction=75
-XX:+UseCMSInitiatingOccupancyOnly

## Locale
# Set the locale language
#-Duser.language=en

# Set the locale country
#-Duser.country=US

# Set the locale variant, if any
#-Duser.variant=

## basic

# set the I/O temp directory
#-Djava.io.tmpdir=$HOME

# set to headless, just in case
-Djava.awt.headless=true

# ensure UTF-8 encoding by default (e.g. filenames)
-Dfile.encoding=UTF-8

# use our provided JNA always versus the system one
#-Djna.nosys=true

# Turn on JRuby invokedynamic
-Djruby.compile.invokedynamic=true
# Force Compilation
-Djruby.jit.threshold=0

## heap dumps

# generate a heap dump when an allocation from the Java heap fails
# heap dumps are created in the working directory of the JVM
-XX:+HeapDumpOnOutOfMemoryError

# specify an alternative path for heap dumps
# ensure the directory exists and has sufficient space
#-XX:HeapDumpPath=${LOGSTASH_HOME}/heapdump.hprof

## GC logging
#-XX:+PrintGCDetails
#-XX:+PrintGCTimeStamps
#-XX:+PrintGCDateStamps
#-XX:+PrintClassHistogram
#-XX:+PrintTenuringDistribution
#-XX:+PrintGCApplicationStoppedTime

# log GC status to a file with time stamps
# ensure the directory exists
#-Xloggc:${LS_GC_LOG_FILE}

# Entropy source for randomness
-Djava.security.egd=file:/dev/urandom
⑥ Logstashの起動確認
以下コマンドを実行
データの入出力をコンソールにして動作確認する。
#
#/usr/share/logstash/bin/logstash --path.settings /etc/logstash -e 'input { stdin { } } filter{ grok { match => { "message" => "%{COMBINEDAPACHELOG}" }}} output { stdout {} }'
#
上記コマンドは以下のconfigを作成してlogstashを起動したことになる。filter 設定等は別の記事に書くのでここではログデータのパースに必要な設定と理解しておいてください。
input {
     stdin {
      }
}
filter {
     grok {
        match => { "message" => "%{COMBINEDAPACHELOG}"
        }
    }
}
output {
     stdout {
      }
}
以下、起動メッセージが出力(30秒くらいかかるかも)されて入力待ちになる。
Sending Logstash logs to /var/log/logstash which is now configured via log4j2.properties
[2019-04-30T00:45:52,585][WARN ][logstash.config.source.multilocal] Ignoring the 'pipelines.yml' file because modules or command line options are specified
[2019-04-30T00:45:52,599][INFO ][logstash.runner          ] Starting Logstash {"logstash.version"=>"7.0.0"}
[2019-04-30T00:45:57,364][INFO ][logstash.javapipeline    ] Starting pipeline {:pipeline_id=>"main", "pipeline.workers"=>2, "pipeline.batch.size"=>125, "pipeline.batch.delay"=>50, "pipeline.max_inflight"=>250, :thread=>"#<Thread:0x2f61ff57 run>"}
[2019-04-30T00:45:57,540][INFO ][logstash.javapipeline    ] Pipeline started {"pipeline.id"=>"main"}
The stdin plugin is now waiting for input:
[2019-04-30T00:45:57,704][INFO ][logstash.agent           ] Pipelines running {:count=>1, :running_pipelines=>[:main], :non_running_pipelines=>[]}
[2019-04-30T00:45:58,362][INFO ][logstash.agent           ] Successfully started Logstash API endpoint {:port=>9600}
入力待ちのコンソールへApacheのログを一行コピペしてみるとログがパースされてフィールドと値に分割されました。とりあえず動作確認はできました。
192.168.11.5 25119 - - [29/Apr/2019:01:34:52 +0900] "GET /sample/hello HTTP/1.1" 200 311 "http://192.168.11.63/sample/" "Mozilla/5.0 (Windows NT 6.3; WOW64; Trident/7.0; rv:11.0) like Gecko"
{
       "@version" => "1",
        "message" => "192.168.11.5 25119 - - [29/Apr/2019:01:34:52 +0900] \"GET /sample/hello HTTP/1.1\" 200 311 \"http://192.168.11.63/sample/\" \"Mozilla/5.0 (Windows NT 6.3; WOW64; Trident/7.0; rv:11.0) like Gecko\"",
       "referrer" => "\"http://192.168.11.63/sample/\"",
    "httpversion" => "1.1",
       "clientip" => "25119",
     "@timestamp" => 2019-04-29T16:05:25.849Z,
        "request" => "/sample/hello",
          "bytes" => "311",
       "response" => "200",
          "agent" => "\"Mozilla/5.0 (Windows NT 6.3; WOW64; Trident/7.0; rv:11.0) like Gecko\"",
          "ident" => "-",
           "verb" => "GET",
           "auth" => "-",
      "timestamp" => "29/Apr/2019:01:34:52 +0900",
           "host" => "sves0002"
}
CTRL-Cで起動したlogstashを停止します。
Logstashのインストールはこれで完了です。
実際のログデータの流し込みは別の記事で。
次回は、FileBeatのインストールです。
いじょ。
