
「XMINGでJCONSOLEを起動する」の関連で・・・
JVMの状態をロギングしたいので、Metricbeatとjolokiaを使ってElasticsearchへMBeanの値を流し込む手順。
前提環境は以下のとおり。
・ターゲットのAPサーバではTomcatが稼働。
・ Metricbeatからjolokia(Proxy mode)経由でJMXへRMI Connectorで接続しMBeanの属性値を取得。
・ 取得した値はElasticsearchへインデクシング。
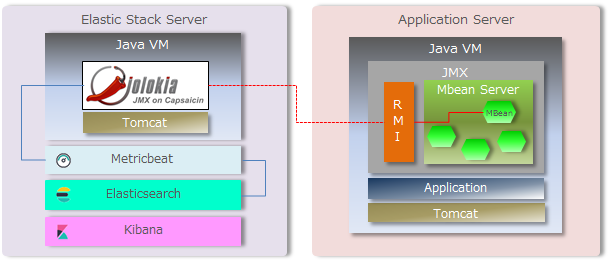
1.JMX エージェント (MBean サーバ) の有効化
⓵ Application Server側のTomcat起動パラメータにJMXエージェントの設定を行う。筆者の環境では、/opt/tomcat/bin 配下へsetenv.shを作成しCATALINA_OPTSを設定する。(起動パラメータの設定箇所は、APサーバ環境によりいろいろな方法があるので適宜読み替えて欲しい)また、この記事ではセキュリティの設定は無効とするが本番運用等で設定する場合は、Oracleの公式ドキュメント等を参照し適切なセキュリティ設定を行ってほしい。
「XMINGでJCONSOLEを起動する」 の記事では、com.sun.management.jmxremote.rmi.port の設定は行っていなかったが、rmi用のportは動的に変更されるためfirewalldを有効にする場合は都合が悪い。この記事ではfirewalldを有効にしている環境のためrmi.portを固定する。
CATALINA_OPTS="-server -Xmx1024m -Xms1024m
               -Dcom.sun.management.jmxremote=true
               -Dcom.sun.management.jmxremote.port=8686
               -Dcom.sun.management.jmxremote.rmi.port=8686
               -Dcom.sun.management.jmxremote.ssl=false
               -Dcom.sun.management.jmxremote.authenticate=false"
export CATALINA_OPTS
⓶ 起動確認
設定後、Tomcat起動(再起動)してJMXが有効(パラメータが設定されていること)になったことを確認する。
# jps -v
3769 Bootstrap -Djava.util.logging.config.file=/opt/tomcat/conf/logging.properties -Djava.util.logging.manager=org.apache.juli.ClassLoaderLogManager -Djdk.tls.ephemeralDHKeySize=2048 -Djava.protocol.handler.pkgs=org.apache.catalina.webresources -Dorg.apache.catalina.security.SecurityListener.UMASK=0027 -Xmx1024m -Xms1024m -Dcom.sun.management.jmxremote=true -Dcom.sun.management.jmxremote.port=8686 -Dcom.sun.management.jmxremote.rmi.port=8686 -Dcom.sun.management.jmxremote.ssl=false -Dcom.sun.management.jmxremote.authenticate=false -Dignore.endorsed.dirs= -Dcatalina.base=/opt/tomcat -Dcatalina.home=/opt/tomcat -Djava.io.tmpdir=/opt/tomcat/temp
3819 Jps -Dapplication.home=/usr/lib/jvm/java-1.8.0-openjdk-1.8.0.212.b04-0.el7_6.x86_64 -Xms8m
[root@sves0001 bin]#
2.jolokiaのデプロイと設定
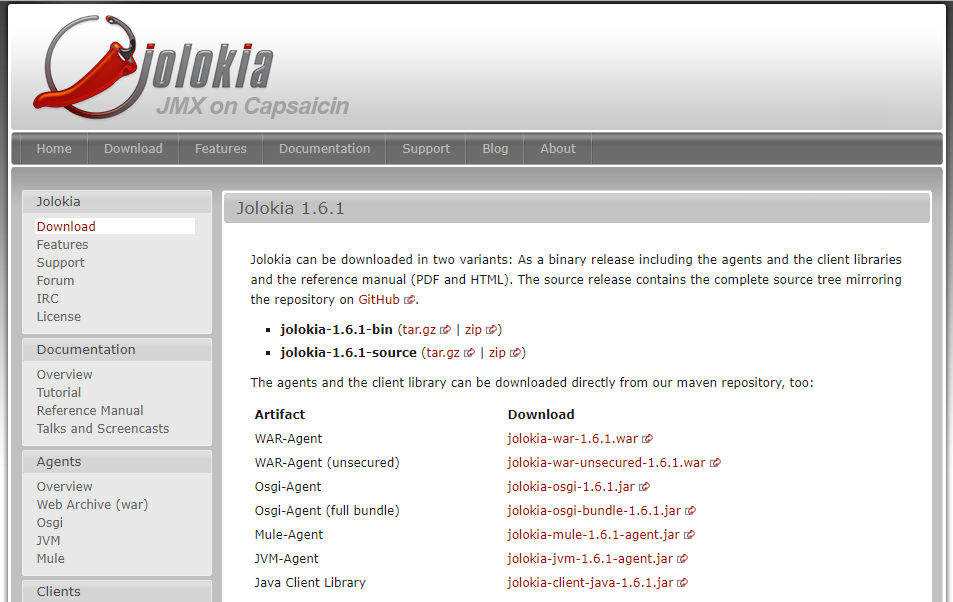
jolokia エージェントをダウンロードしElastic Stack Server側のTomcatへデプロイする。(記事執筆時点のバージョンは1.6.1がCurrentバージョン)
⓵ ダウンロードページから jolokia-war-1.6.1.war ファイルをダウンロードする。
#
# cd /tmp
# curl -O http://search.maven.org/remotecontent?filepath=org/jolokia/jolokia-war/1.6.1/jolokia-war-1.6.1.war
#
⓶ ダウンロードしたwarファイルを/opt/tomcat/webapp 配下へ配置
#
# cd /tmp
# mv jolokia-war-1.6.1.war /opt/tomcat/webapp/jolokia.war
#
⓷ web.xmlの編集
warファイルが展開され(Tomcat未起動の場合は起動する)たら、jolokiaディレクトリが作成されるのでWEB-INF配下のweb.xmlを編集する。jolokiaリファレンスの「Chapter 5. Proxy Mode」に記載のあるとおりinit-paramを追記(27行目~30行目)する。この記事ではセキュリティ設定は行わないのでコメントアウト(162行目~181行目)
<?xml version="1.0" encoding="UTF-8"?>
<!--
  ~ Copyright 2009-2013 Roland Huss
  ~
  ~ Licensed under the Apache License, Version 2.0 (the "License");
  ~ you may not use this file except in compliance with the License.
  ~ You may obtain a copy of the License at
  ~
  ~       http://www.apache.org/licenses/LICENSE-2.0
  ~
  ~ Unless required by applicable law or agreed to in writing, software
  ~ distributed under the License is distributed on an "AS IS" BASIS,
  ~ WITHOUT WARRANTIES OR CONDITIONS OF ANY KIND, either express or implied.
  ~ See the License for the specific language governing permissions and
  ~ limitations under the License.
  -->

<web-app version="2.4" xmlns="http://java.sun.com/xml/ns/j2ee"
         xmlns:xsi="http://www.w3.org/2001/XMLSchema-instance"
         xsi:schemaLocation="http://java.sun.com/xml/ns/j2ee http://java.sun.com/xml/ns/j2ee/web-app_2_4.xsd">

  <display-name>JSON JMX Agent</display-name>

  <servlet>
    <servlet-name>jolokia-agent</servlet-name>
    <servlet-class>org.jolokia.http.AgentServlet</servlet-class>
    <init-param>
       <param-name>dispatcherClasses</param-name>
       <param-value>org.jolokia.jsr160.Jsr160RequestDispatcher</param-value>
    </init-param>
    <init-param>
      <description>
        Debugging state after startup. Can be changed via
        the Config MBean during runtime
      </description>
      <param-name>debug</param-name>
      <param-value>false</param-value>
    </init-param>
    <init-param>
      <description>
        Entries to keep in the history. Can be changed during
        runtime via the config MBean
      </description>
      <param-name>historyMaxEntries</param-name>
      <param-value>10</param-value>
    </init-param>
    <init-param>
      <description>
        Maximum number of entries to keep in the local
        debug history if switched on. Can be change via
        the config MBean during runtime.
      </description>
      <param-name>debugMaxEntries</param-name>
      <param-value>100</param-value>
    </init-param>
    <init-param>
      <description>
        Maximum depth when traversing bean properties.
        If set to 0, depth checking is disabled
      </description>
      <param-name>maxDepth</param-name>
      <param-value>15</param-value>
    </init-param>
    <init-param>
      <description>
        Maximum size of collections returned when
        serializing to JSON. When set to 0
        collections are not truncated.
      </description>
      <param-name>maxCollectionSize</param-name>
      <param-value>0</param-value>
    </init-param>
    <init-param>
      <description>
        Maximum number of objects which is traversed
        when serializing a single response. Use this
        as airbag to avoid boosting your memory and
        network traffic. Nevertheless when set to 0
        not limit is used.
      </description>
      <param-name>maxObjects</param-name>
      <param-value>0</param-value>
    </init-param>
    <init-param>
      <description>
        Options specific for certain application
        server detectors. Detectors can evaluate these
        options and perform a specific initialization based
        on these options. The value is a JSON object with
        the detector's name as key and the options as value.
        E.g. '{glassfish: {bootAmx: false}}' would prevent
        the booting of the AMX subsystem on a glassfish with
        is done by default.
      </description>
      <param-name>detectorOptions</param-name>
      <param-value>{}</param-value>
    </init-param>
    <init-param>
      <description>
        This option specifies in which order the key-value properties within
        ObjectNames as returned by "list" or "search" are returned. By default
        this is the so called 'canonical order' in which the keys are sorted
        alphabetically. If this option is set to "false", then the natural
        order is used, i.e. the object name as it was registered. This option
        can be overridden with a query parameter of the same name.
      </description>
      <param-name>canonicalNaming</param-name>
      <param-value>true</param-value>
    </init-param>
    <init-param>
      <description>
        Whether to include a stacktrace of an exception in case
        of an error. By default it it set to "true" in which case
        the stacktrace is always included. If set to "false", no
        stacktrace is included. If the value is "runtime" a stacktrace
        is only included for RuntimeExceptions. This global option
        can be overridden with a query parameter.
      </description>
      <param-name>includeStackTrace</param-name>
      <param-value>true</param-value>
    </init-param>
    <init-param>
      <description>
        When this parameter is set to "true", then an exception thrown
        will be serialized as JSON and included in the response
        under the key "error_value". By default it is "false". This global
        option can be overridden by a query parameter of the same name.
      </description>
      <param-name>serializeException</param-name>
      <param-value>false</param-value>
    </init-param>
    <init-param>
      <description>
        If discoveryEnabled is set to true, then this servlet will listen
        for multicast discovery request and responds with its agent URL and
        other server specific information. Instead of setting this confog variable,
        discovery can be also enabled via the system property "jolokia.discoveryEnabled"
        or the environment variable "JOLOKIA_DISCOVERY_ENABLED".

        In addition the config parameter "discoveryAgentUrl" can be used to set the the agent's URL.
        By default, auto detection (after the first request was processed by the servlet)) of the URL is used.
        If the URL is set, then discovery is automatically enabled (i.e. there is
        no need to set "discoveryEnabled=true"). This configuration option
        is especially useful if the WAR is used in a proxy setup. Instead of setting the URL
        here, it can be set also either via the system property "jolokia.discoveryAgentUrl" or the
        environment variable "JOLOKIA_DISCOVERY_AGENT_URL".
      </description>
      <param-name>discoveryEnabled</param-name>
      <param-value>false</param-value>
    </init-param>
    <load-on-startup>1</load-on-startup>
  </servlet>

  <servlet-mapping>
    <servlet-name>jolokia-agent</servlet-name>
    <url-pattern>/*</url-pattern>
  </servlet-mapping>

  <!--
  Security enabled by default. Please update to match you specific security setup (e.g. the auth-method)
  -->
  <!--
  <login-config>
    <auth-method>BASIC</auth-method>
    <realm-name>jolokia</realm-name>
  </login-config>

  <security-constraint>
    <web-resource-collection>
      <web-resource-name>Jolokia-Agent Access</web-resource-name>
      <url-pattern>/*</url-pattern>
    </web-resource-collection>
    <auth-constraint>
      <role-name>jolokia</role-name>
    </auth-constraint>
  </security-constraint>

  <security-role>
    <role-name>jolokia</role-name>
  </security-role>
  -->
</web-app>

<!--
  Copyright 2009-2010 Roland Huss

  Licensed under the Apache License, Version 2.0 (the "License");
  you may not use this file except in compliance with the License.
  You may obtain a copy of the License at

      http://www.apache.org/licenses/LICENSE-2.0

  Unless required by applicable law or agreed to in writing, software
  distributed under the License is distributed on an "AS IS" BASIS,
  WITHOUT WARRANTIES OR CONDITIONS OF ANY KIND, either express or implied.
  See the License for the specific language governing permissions and
  limitations under the License.
-->
設定が終わったらTomcatを再起動する。
⓸ 動作確認
Elastic Stack Serverのホスト名をsves0002、 Application Serverのホスト名をsves0001として
Application Server 側のヒープ使用量を取得してみる。(jqはインストール済みの前提)
#
# curl -X POST http://sves0002:8080/jolokia/ -H 'Content-Type:application/json' -d'{
    "type" : "read",
    "mbean" : "java.lang:type=Memory",
    "attribute" : "HeapMemoryUsage",
    "target" : {
         "url" : "service:jmx:rmi:///jndi/rmi://sves0001:8686/jmxrmi"
    }
  }' |jq
#
実行結果
jolokia Proxy modeでの接続と情報取得ができました。
  % Total    % Received % Xferd  Average Speed   Time    Time     Time  Current
                                 Dload  Upload   Total   Spent    Left  Speed
100   482    0   287  100   195    376    255 --:--:-- --:--:-- --:--:--   376
{
  "request": {
    "mbean": "java.lang:type=Memory",
    "attribute": "HeapMemoryUsage",
    "type": "read",
    "target": {
      "url": "service:jmx:rmi:///jndi/rmi://sves0001:8686/jmxrmi"
    }
  },
  "value": {
    "init": 1073741824,
    "committed": 1037959168,
    "max": 1037959168,
    "used": 341610760
  },
  "timestamp": 1559055788,
  "status": 200
}
一旦ここまで。